Friday, February 4, 2011

Where's my buns - Chefs Gallery, Sydney

Ever since it opened, Chefs Gallery has had one big thing going for it - Piggy Buns! I ate at Chefs Gallery last week, so how were the buns? Read on to find out...

Chefs Gallery is located in a large modern space on the side of the Regent Place development (cnr George and Bathurst Streets, Sydney).  On a bright, sunny and very warm day, the blinds at the front are already drawn against the glaring sun. We arrived fairly early for lunch, just after 12pm, and the place was already quite full (it opens at 11am).  The decor is 'contemporary Chinese', with lots of dark wood and padded surfaces.
When asked if we wanted to sit at a table or the counter, I excitedly shouted, 'Counter!', because the counter fronts onto part of the kitchen, and the entertaining noodlemaker...

It's fun to watch the noodles being rolled and stretched. Lots of other cooking action as well, including Flames.

Onto the food.
The menu at Chefs Gallery isn't extensive when compared to those Chinese restaurants that have dozens (or hunderds) of dishes.  Here, there are some hot and cold appetisers, their famous handmade noodles, a couple of fried rices, dumplings, steamed buns, and of course, dessert, featuring the piggy buns.

Things didn't get off to a promising start because some of the dishes we wanted had a little 'N/A' (not available) sticker on them.  We worked around this and ordered alternatives, together with some 'freshly squeezed watermelon juice' because it was so hot.  Wouldn't you know it, there's no watermelon juice (nor the advertised pear juice, either).  We settled for cans of Coke.
Cold pork belly rolls ($8.90)
'Chao shou' prawn and pork wontons in spicy Shanghainese sauce ($8.90)
The pork rolls were pieces of blanched pork belly rolled around carrot and cucumber, refreshing on this hot day, though they could have done with a bit more sauce to liven up the taste. The dumplings were great, nice and soft, with most of the heat coming from the chilli sauce.
'Shou zhua bing' Chinese roti with pork floss($6.90)
'Guo tie' pan-fried pork and prawn dumplings ($8.90)
Fried rice with 3 types of egg ($13.90)
I'd never had Chinese roti before, and it's like a very thin shallot pancake with bits of spring onion scattered throughout the thin, flakey dough - I really liked this dish.  The pan-fired dumplings were only average, with the wrapper a bit tough.  The fried rice was amazingly good, filled with pieces of chopped egg (chicken, salted duck and century eggs).  Not too oily, either.

Feeling quite good at this stage, I had been saving some space for a piggy bun, but it wasn't to be - they were sold out! That's another way of saying 'N/A'. You'd think they'd prepare a surplus of these since they're so popular, but apparently not.

So we settled for a serving of the less-cute but hopefully still adorable 'pumpkin pastry dumplings'. We ordered, then waited. And waited.

After waiting for 30 minutes, we asked a waitress if they were coming any time soon. It was amusing to watch (from our vantage point on the other side of the glass window) as she marched into the kitchen and confronted the hapless kitchen cook who was responsible for the buns. Maybe not a good day for him, as he looked a bit flustered, probably because the piggy buns had run out.

Anyway, now that we had a target, we observed him for another 15 minutes or so while he bludged around having a drink and looking clueless.  Just as we were about to cut our losses and leave, the pumpkin buns arrived.
Pumpkin pastry dumplings ($5.90)
So, the pumpkin dumplings were ordered at 1:18pm, and they arrived just after this photo was taken, at 1:59pm.  They were okay, quite small (and therefore cute), with a gluey rice flour coating around a sweet lotus seed paste filling.  They were gone (into my tummy) in about 30 seconds flat.

Overall, it was a mixed experience at Chefs Gallery.  The dishes that we had were reasonably tasty, with the fried rice a standout.  The unavailability of some dishes was disappointing, as was the wait for the little pumpkin buns.  Also, I got a raging MSG-like headache/thirst/lethargy a couple of hours later, though I don't know if MSG was added to the food.  I may have to risk another visit to find out.

Chefs Gallery
12/501 George Street, Sydney, NSW
Ph: (02) 9267 8877


Chefs Gallery on Urbanspoon

Thursday, February 3, 2011

It's Chinese new year!


Wishing you a prosperous Chinese new year on February 3!

For details on the lucky card above, click here.


And how about some Chinese Almond Cookies to celebrate the occasion?

Tuesday, February 1, 2011

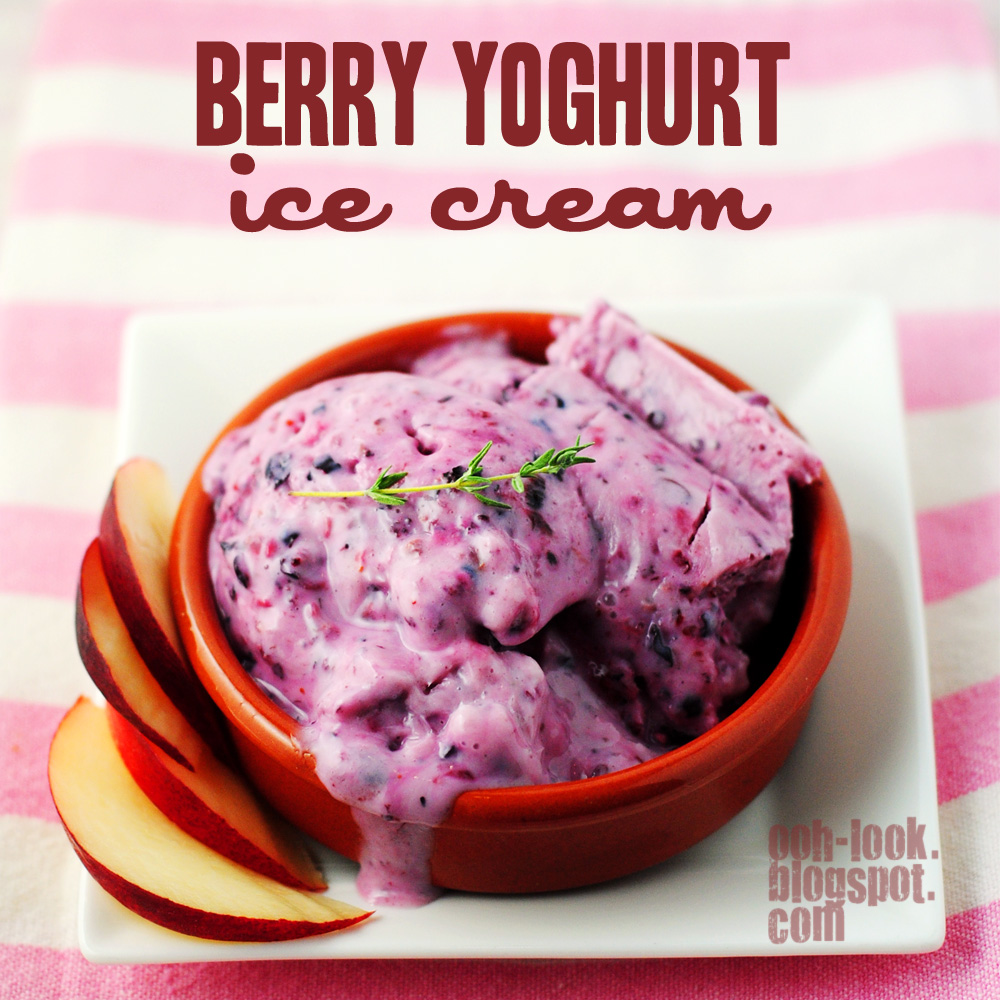
Freeze me now - Berry yoghurt ice cream

Hot -  humid -  sucks-the-life-out-of-you weather means:
...a craving for air conditioning 24x7
...sneaking a Frosty Fruit in the middle of the night
...hating it when the cat lies on top of you to sleep (normally a 'love')
...ICE CREAM!!

Ice cream is always a must-have in my house, so much so that there are several tubs of almost-finished ice cream taking up valuable freezer space. So many flavours, so little time!

I got the idea for this quick and easy treat while watching Jamie Oliver's 30 Minute Meals on television the other week. Have you seen the series yet? Jamie runs around the kitchen with several saucepans, frypans, food processors and kettles on the boil/whizzing away and prepares a 3-course meal in 30 minutes.  I think you'd have to be pretty incredible (or Jamie Oliver) to actually accomplish this, but it makes for good television.

Jamie whipped up an ice cream by mixing a couple of ingredients together, then plonking it in the freezer for 30 minutes while he made the rest of the meal.  I found that my ice cream didn't freeze completely in one hour, let alone 30 mins, though maybe my freezer isn't cold enough.  Just give it a little more time and you'll also be enjoying a scoop or two of this healthy and delicious dessert.

Berry Yoghurt Ice Cream
serves 2-3

Ingredients
1 1/2 cups natural or Greek yoghurt (no-fat or low-fat is okay)
1 cup frozen mixed berries or other fruit (mango would be lovely)
2 tblsp honey, to taste

Method
1. Put the yoghurt, frozen berries and honey into a food processor and mix until combined.  Don't mix for too long or the berries will melt - you want the berries to still be frozen.  Taste and add more honey if you want a sweeter ice cream.
2.  Scrape the mixture into a shallow metal container and place into the freezer for an hour or until almost completely frozen.
3.  To serve, scoop the ice cream into bowls and garnish with fresh fruit, if desired.  The ice cream melts quite quickly, so dig in as soon as possible.

Very simple - just frozen berries, no-fat yoghurt and honey. Mix. Freeze.
My ice cream had some ice crystals and would have benefited from a bit longer in the freezer.  It tasted wonderful...
Great idea, Jamie!

Saturday, January 29, 2011

Adriano Zumbo, TV and Ooh, Look... it's my birthday


You may have heard that Sydney's star patissier, Adriano Zumbo, has a new television show premiering on SBS on February 10.  I'm in 2 minds about this because I alternately love and hate Mr Zumbo.

How do I love thee, Adriano, let me count the ways:
 - Your cakes are so very photogenic
 - You are quite photogenic, too
 - Your patisserie is tantalisingly close to my house and I like to boast about it

Why I can't stand you (sometimes):
 - You make me spend so much money on something that makes me fat
 - You are so popular that I can no longer get into the store
 - The store is so small and service there is so slow (not really your fault but the staff do wear your name on their t-shirts).

That makes it even stevens, no?  I will be tuning in to the show, don't worry about that!


It also happens to be this blog's THIRD BIRTHDAY *release the streamers!!*

How's that for great timing?  I originally posted on Zumbo cake several times a week, hence the rapid weight gain in the early days, though the weight has recently, disturbingly, plateaued even though I'm no longer eating so much cake. 

Anyhoo, the focus these days is more on food that I like to prepare for dinner and dessert and poor ol' Zumbo has been relegated to my Tumblr blog, together with the cat.  I'm sure they are thrilled to be there.

Let me know if you are happy with this arrangement, though if you aren't I would not count on any more changes any time soon  - and this is a lead-in to the fact that my blog header here has changed. Or didn't you notice???  So (here's more stats) in the three years since this blog started, I have:
 - posted about Zumbo cakes more than 100 times
 - posted about 'other' cakes 12 times
 - presented over 100 recipes
 - started a craft blog (please visit it here, it's very colourful)
 - changed the header once
 - received thousands of wonderful comments from amazing and supportive readers - thank you all!

Finally, here's some eye candy for you, a kind of birthday present, in the absence of actual cake. Hope you like it!

And,
For most of the original Adriano Zumbo cakes I've blogged about, click here.
For more recent Adriano Zumbo cakes, including the latest Summer 2010 range, click here.


This is still the most bizarre creation:

Thursday, January 27, 2011

Moderately hot - Horseradish Pesto

There's something about horseradish cream that makes it lift any type of food out of the doldrums.  Any type of savoury food, that is, as I can't imagine horseradish on something sweet (have you tried wasabi ice cream? Ick!)

This recipe is basically an ordinary green pesto with the addition of horseradish cream. You could also use unadulterated horseradish, but being the cream hound that I am, that's what I added, and it's not a bad substitute at all.  The horseradish adds a nice back-of-the tongue heat to the pesto that is very addictive.

Horseradish pesto
makes 1/2 cup

Ingredients
2 cups basil leaves, roughly torn
2 tblsp store-bought horseradish cream
2 tblsp pinenuts, toasted
2 tblsp parmesan, finely grated
sea salt and cracked black pepper
1/4 cup olive oil

Method
1.  Place the basil, horseradish cream, pinenuts, cheese, salt, pepper and oil in the bowl of a food processor and process until smooth.

recipe adapted from donna hay (feb/mar 2010)

Just throw everything into a food processor and whiz it.


Serving suggestion 1: Mix the horseradish pesto through cooked pasta, with some torn rocket or spinach leaves.


Serving suggestion 2: Dollop the horseradish pesto on a smoked trout salad - chunks of hot-smoked ocean trout (or salmon), boiled potatoes and green beans.

Monday, January 24, 2011

Olé! Friday night fish tacos and everybody's happy

Remember this song?

Today's Monday, today's Monday.
Monday is washing day
Tuesday's soup,
Wednesday's roast beef
Thursday's shepherds pie
Friday's fiiiish
Saturday's payday
Sunday's church
Is everybody happy?
You bet your life we are!

Well, how times change...
At my place, Friday night used to be chicken schnitzel night, then it was pizza night, and now it's Taco Night! To fit it in with the song, let's make it Fish taco night. 

Friday's fish tacos
Is everybody happy?
You bet your life we are!!

Come to think of it, any night should be crispy fish taco night!

Fish tacos
serves 2

Ingredients
2-3 firm white fish fillets (like whiting or ling), skin removed
3 tblsp coarse dried breadcrumbs, or panko breadcrumbs
1 tblsp lemon zest
1 egg, beaten
3 tblsp olive oil
4 taco shells
2 roma tomatoes, sliced
1 red onion, sliced
1 avocado, diced
1 cup Greek yoghurt or sour cream
1/4 tsp paprika
handful of rocket or baby spinach leaves

Method
1.  For the fish: Cut the fish into long fingers.  Mix the breadcrumbs and lemon zest on in a shallow bowl. Dip the fish into the beaten egg and then the crumbs.  Heat the oil in a large frypan and cook on all sides until golden, about 4 minutes.  Season the fish with salt and pepper.
2.  For the avocado dip: Crush the avocado into the yoghurt and mix until combined.  Sprinkle with paprika.
3.  To assemble the tacos: Heat the taco shells for 5 minutes in a 160C oven.  Remove from the oven and fill with the salad leaves, tomato, onion and cooked fish.  Serve the tacos dolloped with some avocado dip.

Ingredients - taco shells, salad-y stuff, white fish fillets, panko crumbs and beaten egg.

These tacos are fresh-tasting and quite light, and a great alternative to traditional beef/chicken/bean tacos.  You could also use soft flour tortillas instead of taco shells.

Crunchy taco shells and crispy fish - yum!

Thursday, January 20, 2011

Zounds! A Lemon posset with passionfruit!

Don't you love the word 'posset'?

posset (noun). A posset (also spelled poshote, poshotte) was a British hot drink of milk curdled with wine or ale, often spiced, which was popular from medieval times to the 19th century. The word is mainly used nowadays for a related dessert similar to syllabub.  source: wikipedia

'Posset' has such an olde worlde, medieval ring to it. It ranks up there with "odds bodkins", "the chalice from the palace has the brew that is true", "mead", and "trifle not with me, mi'lady!" as classic words and phrases from the Galahad/Lancelot/Guinevere era.  Bring back jousting, I say!

Well, maybe not jousting and jesters.  Let's just start with a lovely lemon posset.  It's like a smooth, creamy lemon mousse, and it's made with just 3 ingredients.  Perfect to languidly lick from a spoon while waiting for your knight in shining armour to gallop up and liberate you from your life of serf-itude.

Lemon posset with passionfruit
serves 4

Ingredients
300ml thickened cream
90g caster sugar
70ml lemon juice
2 passionfruit, to serve

Method
1.  Put the cream and caster sugar in a saucepan and bring to the boil, stirring occasionally.
2.  Reduce heat and simmer for 3 minutes, stirring, until the mixture thickens.
3.  Remove from the heat and stir in the lemon juice.  Cool in the saucepan for 30 minutes, then strain into serving glasses.  Cool slightly, then cover and refrigerate for 3 hours or overnight.
4.  Spoon the pulp from the passionfruit over the possets before serving.
Ingredients - all you need is cream, sugar and lemon juice. 
Simmer the cream and sugar in a saucepan, then add the lemon juice and strain into glasses. 
This recipe serves 4, but I made it for 2 - more for each lucky person!
The possets can be topped with any fruit, like the tangy passionfruit and blueberries here.
Hey nonny nonny, come hither and try this posset. Tis verily splendid!
[And avoid the vessel with the pestle]

Tuesday, January 18, 2011

Allegedly healthy potato and green bean salad

Does 'potato' count as part of one's daily requirement of vegetables? 
If yes, then are potato chips, dare I say, healthy?

Probably taking it a bit too far, but it's a thought, isn't it?  For some reason, kipfler (or fingerling) potatoes have a healthier vibe to me.  Maybe because they've been fairly rare on the supermarket shelves before now.  Anyway, the kipfler is a waxy potato, which makes it perfect in salads, because they are less likely to break up when cooked and tossed.  Also, like all potatoes, kipflers are high GI, so are good if you need a quick burst of energy after a bout of exercise (ha!).  Though apart from that, they probably aren't the best choice for weight loss.

And because my star sign is Libra, I need to balance out the doubtful healthfulness of potatoes with the goodness of other veges, like green beans. And then balance that out with some bacon.  Swings and roundabouts, people!

Roast potatos with green beans and bacon
serves 4

Ingredients
6 kipfler potatoes, halved lengthways
4 rashers bacon, chopped
1 tblsp olive oil
salt and black pepper
100g green beans, trimmed and blanched

Mustard dressing:
1/4 cup (60ml) olive oil
1 tblsp white wine vinegar
1 tblsp lemon juice
1 tblsp Dijon mustard

Method
1. For the mustard dressing: place the oil, vinegar, lemon juice, mustard, salt and pepperin a bowl and whisk until well combined.
2. Preheat oven to 180C (350F).  Place potatoes, bacon and oil in a baking dish, sprinkle with salt and toss to coat.  Roast for 40 minutes., turning occasionally, or until crisp and golden.
3. Serve the roasted potatoes with the green beans and drizzled with mustard dressing.

recipe adapted from donna hay (dec/jan 2011)

Ingredients, including kipfler potatoes (with pot/potato scrubber), bacon, green beans and prepared mustard dressing.  The original recipe uses speck (cured ham) instead of bacon.
This salad makes a lovely, light lunch or dinner. 
Health formula: Bacon + potato =  green beans

Friday, January 14, 2011

New Year, Sparkling Jellies, of course

This is what we had to ring in the new year. 

Normally, it would be a drop of something sparkling in a glass, but this year, I decided to get with the jelllies again and try incorporating bubbles into a dessert. 

The recipe calls for a pink sparkling wine, like Moscato, and its sweet (alchoholic) effervescence makes the jelly that little bit more grown up.  If you don't want it to be so *hic* grown-up, just substitute some of the wine with water to make up the amount of liquid.

And how was new year's eve?  Well, it was humid and warm, and after strolling down the road to view the spectacular Sydney fireworks, we came home, got tipsy on sparkling jelly with raspberries and watched dvds of the 'IT Crowd'.  A fine night!

Sparkling Jellies
serves 8

Ingredients
2 1/2  tsp gelatine powder
1/4 cup (60ml) water
750ml  pink sparkling wine, such as Moscato
1/2 cup (110g) caster sugar, to taste

Method
1.  Place the gelatine and water in a cup and stir to combine.  Set aside for 5 minutes or until the gelatine is absorbed.
2.  Place the wine and sugar in a saucepan over medium heat and stir until sugar is dissolved.  Add the gelatine  and cook, stirring, for 1-2 minutes until the gelatine is dissolved.  Set aside to cool.
3.  Divide the mixture between 4 glasses and refrigerate 3 hours or overnight until set.  Serve with berries, sorbet or ice cream.

recipe adapted from donna hay (dec/jan 2011)

The wine used was Killawarra Dusk, a strawberry-infused sparkling wine.  Actually, it was rather grim when drunk on its own, and adding sugar to it in this jelly was the only way to make it palatable. 
These jellies were served with fresh raspberries.
The jelly has a lovely tingling effect on the tongue due to the bubbles in the wine.
Perfect for that sparkling occasion!

Tuesday, January 11, 2011

Best ever Chicken Liver Pate

Get ready for a taste sensation.
Or, here's a tip: if you're able to bottle and market this, you could make a million
You heard it here first...

Most people either love or hate chicken or duck liver.  I love it, though when growing up, liver in our household was usually braised in an Asian-style soy sauce together with giblets.  Mmm, liver and giblets...
Fast-forward to my now more 'sophisticated' tastes, and chicken liver pate is what gets me excited.  This recipe by Belinda Jeffery is what her mother made for an after-school snack. Why didn't my mum ever make this?  Dunno, though the liver and giblets really makes me misty-eyed...

Anyway, back to this recipe - it's so brilliant. The caramelised onion and bacon elevate the chicken liver out of the ordinary, and instead of brandy, I used Grand Marnier, and it adds a subtle sweetness to the pate that is lip-smackingly good.  When served this pate on New Year's day, my guests asked why I didn't sell it, as I'd make the proverbial million.  Well, I don't really fancy spending my days sieving pate, but the thought is true - this pate is that good.     

Chicken Liver Pate
makes approx 3 cups

Ingredients
500g chicken livers, trimmed, sinew removed
3/4 cup (185ml) milk
1/2 cup (125ml) extra virgin olive oil
2 brown onions, chopped
2 small garlic cloves, finely chopped
3 bacon rashers, rind removed, chopped
1 tblsp thyme leaves, plus sprigs for garnish
2 tblsp brandy or Grand Marniner
1 1/2 tblsp balsamic vinegar
170g chilled cultured unsalted butter, chopped, plus 80g melted, cooled

Method
1.  Place chicken livers in bowl, cover with milk and refrigerate while you prepare the remaining ingredients.
2.  Heat 1 tablespoon of olive oil in a large frying pan over medium-high heat.  Add onion, garlic and bacon, and cook, stirring, for 12 minutes until the onion caramelises.  Mix in thyme, then add brandy (or Grand Marnier) and 1 tablespoon of water, stirring to deglaze the pan.  Transfer to a bowl.
3.  Wipe pan clean and return to high heat with remaining oil.  Drain chicken livers and pat dry with paper towel, then cook for 2-3 minutes each side until browned and slightly crusty but still pink inside.  Add to the bowl with the onion mixture and season well with salt and pepper.
4.  Return pan to heat, splash with vinegar to deglaze the pan again.  Then scrape the juices into the bowl with the livers.  Puree mixture very finely in blender or food processor with the chilled, chopped butter.  For an extra-silky texture use a spatula or spoon to force the mixture through a fine sieve into a bowl.
5.  Smooth the pate into four 180ml ceramic pots or a 750ml dish.  Pour a thin film of melted butter on top to seal, then top with a thyme sprig.  Cover and keep in the refrigerator for up to 5 days.  Serve with crusty bread.

recipe adapted from delicious (March 2010)


Ingredients, including Grand Marnier, milk for soaking the chicken livers, bacon, onion, garlic, thyme, balsamic vinegar and olive oil.  Lurpak-brand butter is cultured and unsalted.


The chopped onions and garlic prior to cooking. 
The pate does not take long to make, but I did spend 45 minutes sieving it to produce a silken smooth result (and yes, it was worth doing!)


Take the pate out of the fridge a few minutes before you want to serve it; the butter seal will soften a bit, making it easier to spoon out.

Serve the pate with toast points or slices of baguette. I found that fresh, soft bread complemented this rich, smooth, gorgeous pate the best.
Tabitha cat has developed a habit of watching while I cook. And also a habit of investigating the end result. Fortunately, the pate was covered with a hygenic layer of plastic wrap before she found them.
LinkWithin