Monday, February 27, 2012

Lemon lime tart plus WIN STUFF!


I’ve always loved the idea of a pie, a homely high-top apple pie cooling on the window sill, filling the kitchen with warm, spicy aromas, curtains fluttering in the gentle breeze. But then, my realistic streak kicks in – why would you leave a pie on the window sill? Isn’t it unhygienic? What about the flies and bugs that might land on it? What if it tips over? What if Foghorn Leghorn wanders by and snitches it? And wah!, I don’t have fluttery gingham curtains in my kitchen so the effect is ruined anyway!

It’s never actually stopped me from eating pies, but I’ve never really made a ‘proper’ one, either, with a crumbly shortcrust pastry, luscious gooey filling and, maybe, an egg-washed, golden high top that is just begging for a dollop of thick cream to decorate it.

I still haven’t made such a pie, but since I got a food processor, pastry-making isn’t such a big deal anymore. And now that I have some ceramic pie weights, blind-baking a shortcrust has become a whole lot easier. Hence this lovely lemon lime tart. And the path to a holy grail apple pie is just another step closer.

Lemon and lime tart
serves 10

Ingredients
Pastry:
2 cups plain flour
1/4 cup icing sugar
150g butter chopped
1 egg yolk
2 tablespoons iced water

Filling:
5 eggs, lightly beaten
3/4 cup caster sugar
300ml thickened cream (cream that has gelatine added; can be low fat)
2 teaspoons finely grated lemon rind
1/2 cup lemon and lime juice (approx 2 lemons and 1 lime)

Method
1. For the pastry: Place flour, icing sugar and butter in a food processor. Process until mixture resembles fine breadcrumbs. Add egg yolks and water. Process until dough clumps together in a ball. Remove from the food processor and shape into a disc. Wrap in plastic and refrigerate for 30 minutes to firm it up.

2. Preheat oven to 190°C/375°F. Grease a deep, 24cm/9in round, loose-based flan tin. Roll out pastry between 2 sheets of baking paper until 3mm/1/8in-thick. Line the tin with pastry; trrim off excess. Refrigerate for 15 minutes.

3. Place prepared tin on a baking tray. Line pastry case with baking paper. Fill with ceramic pie weights or uncooked rice. Bake for 10 minutes. Remove weights or rice and baking paper. Bake for 10 minutes or until light golden. Cool pastry case. Reduce oven temperature to 170°C/340°F.

4. For the lemon filling: Whisk eggs, sugar, cream, lemon rind and lemon juice in a bowl. Stand 5 minutes.

5. Pour mixture into pastry case. Bake for 30 to 35 minutes or until filling has just set. Cool for 15 minutes. Refrigerate overnight or until chilled.

recipe adapted from Super Food Ideas (Aug 2011)
The pastry is easily made in a food processor, though if you have strong arms, it can be done manually.
Handy hint: Rolling the dough between 2 sheets of baking paper will reduce cleanup of your benchtop.

Ceramic pie weights definitely make it easier to blind-bake the pastry case (read further on to see how you could win your own).
The filling is a delicious blend of cream, eggs and lemon and lime juice.
The number of lemons and limes depends on how juicy they are. I used 2 lemons and 1 lime.

The tart is baked until the filling is set, though it is a fairly wobbly filling anyway.

Tangy, lemony, with a hint of lime - this tart is sublime!


------
A Kitchenware Direct Giveaway


The folks at KitchenwareDirect.com.au have kindly provided these brilliant baking tools for you to win.
The prize consists of:
MasterChef mixing bowl 3-piece set
MasterChef stoneware pastry weights in a glass jar

Having used these products in making the lemon lime tart, I can vouch for their quality and usefulness (the winner will get a brand new set, obviously!). They've also gotten rave reviews on the kitchenwaredirect.com.au website.
 The bowls are stainless steel and come in 1.5 litre, 3 litre and 5 litre sizes. The pastry weights are a great alternative to the uncooked rice that I normally use, and the glass jar they are stored in is a fantastic idea (and heaps better than my plastic bag of rice with 'Do not eat!!!' written on it).

To be in the running to win this stash of goodies (with fast delivery from KitchenwareDirect.com.au):
 - Leave a comment on this post and tell me what your favourite pie or tart flavour is. Remember to include your blog or email contact details.
- Alternatively, enter by email to: oohlookbel2000 [at] gmail [dot] com.

You have until end of Sunday 11 March 2012 to get your entries in.
Small print conditions are at the end of this post.
Good luck!
------

12th March 2012:  We have a Winner!

Thanks to everyone who entered the kitchenwaredirect.com.au giveaway.
The randomly selected winner is:
Anna @ The Littlest Anchovy

Congratulations, Anna; I will email you.


Conditions of entry for Kitchenware Direct giveaway:
1. Entry is via valid comment on this post. Entries are also accepted via email to Ooh, Look.
2. Entries close at midnight on 11 March 2012.
3. Winner will be randomly selected
4. Sorry, the prize can only be sent to Australian addresses
5. Prize is provided by and will be sent from kitchenwaredirect.com.au

Thursday, February 23, 2012

These are lettuce dill and mint cakes, not fritters


These are Not Fritters, I promise!

Well, the Fritter Queen has done it again, unintentionally, this time. These lettuce, dill and mint cakes looked so cute in the magainze picture, like little balls of crispy pommes noisette but with the added goodness of green. How, then, did I end up with big, fat, flat patty/fritters?

I think it's because I didn't shredd the lettuce finely enough, so the balls didn't hold together very well. So, to make them stick, I made them bigger, as you do. And then, to cook them through, I had to flatten the big balls, and voila - fritters again. Not that there's anything wrong with that; I'm just annoyed that my 'cakes' don't look anything like the magazine picture. They still tasted sensational, though.

Get more fritters here, here, here and here.

Lettuce, dill and mint cakes
makes approx. 16


Ingredients
1 large iceberg lettuce, finely shredded and chopped
4 eggs
1 red onion, finely chopped
3 cups fresh white breadcrumbs
2 tblsp finely chopped dill
2 tblsp finely chopped mint
1 cup dry breadcrumbs
Vegetable oil or rice bran oil, to shallow-fry
Lemon wedges, to serve


Method
1. Place the lettuce with 2 teaspoons of salt in a large bowl and toss together. Transfer to a colander or large sieve and leave to drain for 1 hour. After the liquid has drained, place the lettuce into a clean tea towel and squeeze well to remove the remaining moisture.
2. Whisk the eggs until foamy, then add the lettuce, onion, fresh breadcrumbs, dill and mint. Season with salt and pepper then mix well to combine.
3. Roll the mixture into balls then roll in the dry breadcrumbs to coat.
4. Heat a large frypan over medium heat and add a layer of oil to cover the surface. Fry the cakes for 2 minutes on each side, flattening them slightly with a spatula while frying. Remove with a slotted spoon and drain on paper towels.
5. Serve the cakes warm or at room temperature with lemon wedges.

recipe adapted from delicious (March 2012)

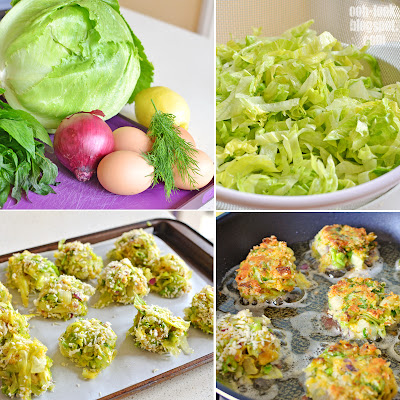
Ingredients, including mint, lettuce, red onion, dill and lemon to serve.
The shredded lettuce is salted and left to drain, to draw out the moisture (it also draws out some of the fresh green colour, but never mind).
These are meant to be delicate little balls, but they look like plops of something.
To make them cook through, I flattened the plops and they turned out like... fritters.

All's well that ends well. These still look very appetising.

Extremely delish, and leftovers can be stored in the fridge for the next day.

Love the crispy outside and the luscious, minty and dill-scented lettuce-y inside!

-----
Tabitha vs Henry Update
episode 5: "Kitty Kornered"

Poor Tabitha. She's sitting innocently on the wall when the tinkle of a bell heralds the arrival of Henry cat.
Too late to scramble down, she's stuck.
Until her kindly owner comes to shoo Henry away (but only after shooting a couple of frames and having a giggle at her predicament).

Monday, February 20, 2012

Still in the Mood for Love


Another great restaurant in the dining precinct of Westfield Sydney Level 6. And you don't even have to wait till Valentine's Day or anything.

We've been to Chinta Ria Mood for Love a couple of times now, and each time have had the tasting menu because it's such great value. It's called "Chef John Poh's Sensual Delight Menu", and for $55 per person, you get around 8 courses plus dessert.

This menu is billed as something that you should share with that special someone, but you get heaps of food and it is so fantastically flavoursome that it would be a shame not to share the pan-Malaysian food love with lots of friends. Also, the menu has had slight changes with each visit, but it's been great every time.

Nice, dark and moody decor inside, with owner Simon Goh's version of the movie Mood for Love projected onto a wall. Waitstaff are mainly young, and helpful and friendly.

Starters
Satay chicken, satay beef (lovely charred charcoal bits)
Otak Otak - Spanish mackeral mousse (sooo spicy! sooo tasty! This has become my fave Malaysian dish)
Seduction roll - minced chicken with 5-spice seasoning in beancurd skin (reminds me of the fried ham roll in old-school Chinese restaurants, remember those?)
Chilli scallops - steamed half-shell scallops with sweet chilli sauce (nice fat scallops, very spicy sauce)

Mains
Monk's mushrooms - fried enoki, braised trumpet and shiitake, snow peas
Pearly butter prawns - prawns in buttermilk, snap-fried (lots of butter gives it fantastic flavour)
Beef rendang - braised beef with spices and coconut milk (this is great with heaps of rice)
Squeeze me squiddy - deep-fried squid with turmeric and chilli (great version of salt and pepper squid)
Roti ($3.90) - no pic; the waitress suggested some roti, but the serving was tiny and the roti were a bit chewy

Sensual Dessert Platter
Pandan sago - swimming in sweet coconut milk. Divine.
Kueh dadar - coconut and palm sugar wrapped in pandan crepe
Durian panna cotta - lovely texture, but you'd have to like durian to like this. I'm iffy with it.
Coconut slice - like kueh, I think. It was alright.

So if you haven't been to Mood for Love yet, or don't want to queue over at Chat Thai, give it a go. Not having tried the regular menu, I can't comment on it, but the tasting menu does contain items on the main menu, just smaller portions. But like I said, there's plenty of it and we'll probably experience this 'sensual delight' many times more.

Chinta Ria Mood for Love is on Level 6, Westfield Sydney, 100 Market St, Sydney NSW
ph: 02 8072 8888  web: http://www.chintamoodforlove.com/
We've always been able to get a table without a booking (in the evenings). 

Chinta Ria... Mood for Love on Urbanspoon

PS: The restaurant is perfectly located for a spot of window shopping afterwards...

Tuesday, February 14, 2012

Heartbreak white chocolate cupcakes

Of all the Valentine's cupcakes in all the towns in all the world, she had to choose this one...

Well, hello! It’s Valentine’s Day again. Not to be a cynic, but is there any valid reason for such a day, apart from providing something to write about or cook heart-themed cupcakes for? Truth be told, there’s something about the rose-strewn bouquets and big, fluffy, white teddy bears that makes me feel a bit erky perky...

I understand, though, that it’s the florists’ busiest and most profitable day, so let’s not begrudge them their livelihood. Personally, I’d be very embarrassed to have a large arrangement (with helium-filled foil balloons, God forbid) delivered to me. So to all of my many, many secret admirers, please take note!

If you must celebrate this soppy day, however, how about going straight to the heart via the stomach, with these amazing white chocolate cupcakes. They are the moistest, delicious-est, smoothest cupcakes ever. And if you want to tell that particular someone how you feel about them, a broken chocolate heart sends just the right message, n’est pas?

White chocolate cupcakes
makes 12

Ingredients
100g (3 ½ oz) butter, softened
¾ cup caster (superfine) sugar
2 eggs
1 1/3 cups plain flour
1 tsp baking powder
½ cup milk
100g (3 ½ oz) white chocolate, melted

White chocolate ganache:
125g (4 oz) white chocolate, chopped
¼ cup pouring cream
35g (1 ¼ oz) butter

Chocolate hearts:
100g dark chocolate

Method
1. Preheat oven to 160C/320F. Line a 12 x ½ cup muffin tray with 12 paper liners.
2. Beat butter and sugar with an electric mixer until light and fluffy. Add eggs, one at a time, beating well after each addition.
3. Sift the flour and baking powder over the butter and sugar mixture and beat until well combined.
4. Add the milk and melted white chocolate and mix well.
5. Spoon the mixture into the prepared paper liners and bake in the oven for 20 minutes, or until a skewer inserted into the cakes comes out clean. Remove cakes from oven and cool completely on a wire rack.
6. For the ganache: Place the white chocolate, cream and butter in a microwave-safe dish. Microwave on medium-low setting in 30-second bursts, stirring after each burst, until the chocolate is melted. Stir mixture until smooth. Spread ganache on the cooled cupcakes.
7. For the chocolate hearts: Place the dark chocolate in a microwave-safe dish. Microwave on medium-low setting in 30-second bursts, stirring after each burst, until the chocolate is melted. Stir mixture until smooth. Spread the melted chocolate onto a parchment-lined baking tray, about 2mm (1/8”) thick. Place in refrigerator to set, about 10 minutes. Use a heart-shaped cutter to cut shapes from the chocolate, then place on the cupcakes.

cupcake recipe adapted from donna hay 'simple essentials: chocolate'
Ingredients, including white chocolate, sugar, eggs and butter.
The cupcake batter is spooned into a muffin tray and baked.
Make some chocolate hearts by spreading melted chocolate onto baking paper and cutting out heart shapes.

These cupcakes will heal that broken heart, stat!


Look at the inside: moist, smooth and gorgeous.

Wednesday, February 8, 2012

Spicy fish burgers - tribute to the filet de fish


Confession time: The other day, I had some McDonald's fries. It had been over 12 months since my last fry at Maccas, and it's been over a year since I last had a burger there.  The fries were okay, as was the hot fudge sundae that accompanied them, but honestly, I really didn't feel like having a burger or wrap or 'chicken' nuggets at all, so I think I've turned a corner when it comes to traditional fast food. And please don't get me started on that 'other' burger joint (rhymes with hairy backs) that makes my skin crawl every time I walk past - when pigeons stroll in and start pecking at the scraps on the floor, well, time to call the Food Authority...

I did notice, though, that the Filet-o-Fish isn't on the menu anymore. I used to like the FoF, with its tender feelay on a bun that was so soft that you didn't need to use your teeth to chew it; you just needed to mash your tongue against it and it would dissolve like fairies having a hissy fit. And occasionally, there'd be a small bone in the fish feelay, just to wake you up as you dozily swallowed another mouthful of barely chewed burger bun.

Here's an alternative fish burger with a hint of spice and hardly a bone to be found. On a bun that begs a strong set of teeth to get through. Now that's a burger!

Spicy Fish Burgers
serves 2

Ingredients
1 clove garlic, crushed
1/2 tblsp olive oil
1/2 tsp hot chilli sauce (sriracha)
1 tblsp lime juice
salt and pepper
1 tsp olive oil, for pan-frying
2 snapper fillets, skin on
2 ciabatta or crusty bread rolls, halved
butter lettuce and/or radicchio leaves
4 tblsp tzatziki or plain yoghurt

Method
1. Mix the garlic, oil, hot sauce, lime juice and salt and pepper together in a bowl. Add the fish fillets and coat well.
2. Heat additional olive oil in a large frying pan over high heat. Place the fish skin-side down in the pan and cook for 4 minutes. Turn and cook the other side for another 2 minutes, until cooked through.
3. Spread the bread rolls with tzatziki, then add lettuce leaves and top with the cooked fish. Serve.

recipe adapted from donna hay (Jan 2012)

Ingredients, including hot sauce, crushed garlic, olive oil and lime.
Some baby cherry tomatoes as a side salad.
The snapper fillets are coated in the marinade.

Simply serve the fish on the bread rolls.
I actually used some toasted 'pizza bread', which comes sprinkled with herbs.

-----

A Tabitha vs Henry Update!

Even though he's a killer, Henry is a really playful cat. He's always rolling on his back. It's pretty funny to watch. And he loves my backyard for rolling, for some reason.
Tabitha is the complete opposite, a totally serious cat whose idea of fun is getting stuck into the catnip (when Henry's not around).
Kinda hoping that opposites attract and they will become friends, but it's looking unlikely.

Wednesday, February 1, 2012

White Chocolate Raspberry Cheesecake haz sugar


A couple of weeks ago, I made the grave blunder of attempting to give up sugar. It was a rookie mistake, because, as most serial giver-uppers will tell you, to stop something cold-turkey can be pretty much impossible, especially when you have as little willpower as I do.

The result was a couple of days of extreme crabbiness that would put Lucy van Pelt’s tetchiness to shame. Gosh, how snappy can you get? (Answer: Very!).

What I should have done was to pace it out, plan what to cut out, do it graaaadually. I eventually came to my senses and got some help, but I think it’s going to be a very long road. Check back here in a year’s time and I’ll let you know where things stand.

Meanwhile, here’s a delicious sugar-laden dessert to help ease the withdrawal pangs (only kidding!).


White chocolate and raspberry cheesecake
serves 10

Ingredients
Base:
200g sweet plain biscuits (eg. Arnott’s Scotch Finger or Nice)
100g butter, melted

Filling:
300g white chocolate, chopped
500g cream cheese, at room temperature
½ cup caster sugar
1 cup thickened cream (ie. cream with added gelatine or thickeners)
2 tblsp lemon juice
3 tsp gelatine, whisked into 3 tblsp boiling water
100g raspberries, fresh or frozen (and thawed)
Extra berries, for decoration

Method
1. Grease and line a 20cm springform cake tin with baking paper.
2. For the base: Crush the biscuits into fine crumbs (place biscuits in a plastic bag and hit with a rolling pin, or use a food processor), then mix in the melted butter. Press the mixture firmly into the base of the cake tin. Place in refrigerator.
3. For the filling: Melt the white chocolate (in a bowl set over boiling water, or in the microwave on low setting in 30-second bursts, until melted). Set aside.
4. Place the cream cheese and sugar in a bowl and mix until combined (this can also be done in a food processor). Add the melted white chocolate, cream, lemon juice and gelatine and mix well. Then add the raspberries and mix until just combined.
5. Pour the filling into the biscuit crust and refrigerate for 3 hours, or until firm.
6. To serve: Remove the cheesecake from the tin and top with additional berries and a sprinkle of icing sugar, if desired.

Ingredients, including sugary white chocolate and raspberries;
a food processer means never having to bash biscuits in a plastic bag again;
cutting the baking paper to fit the springform pan is an exact science;
lovely gooey cheesecake filling

A pretty good cheesecake, topped with fresh berries and icing sugar.
What, more sugar? It's for decoration, so it's alright.


It's even prettier from above:
LinkWithin