Monday, June 27, 2011

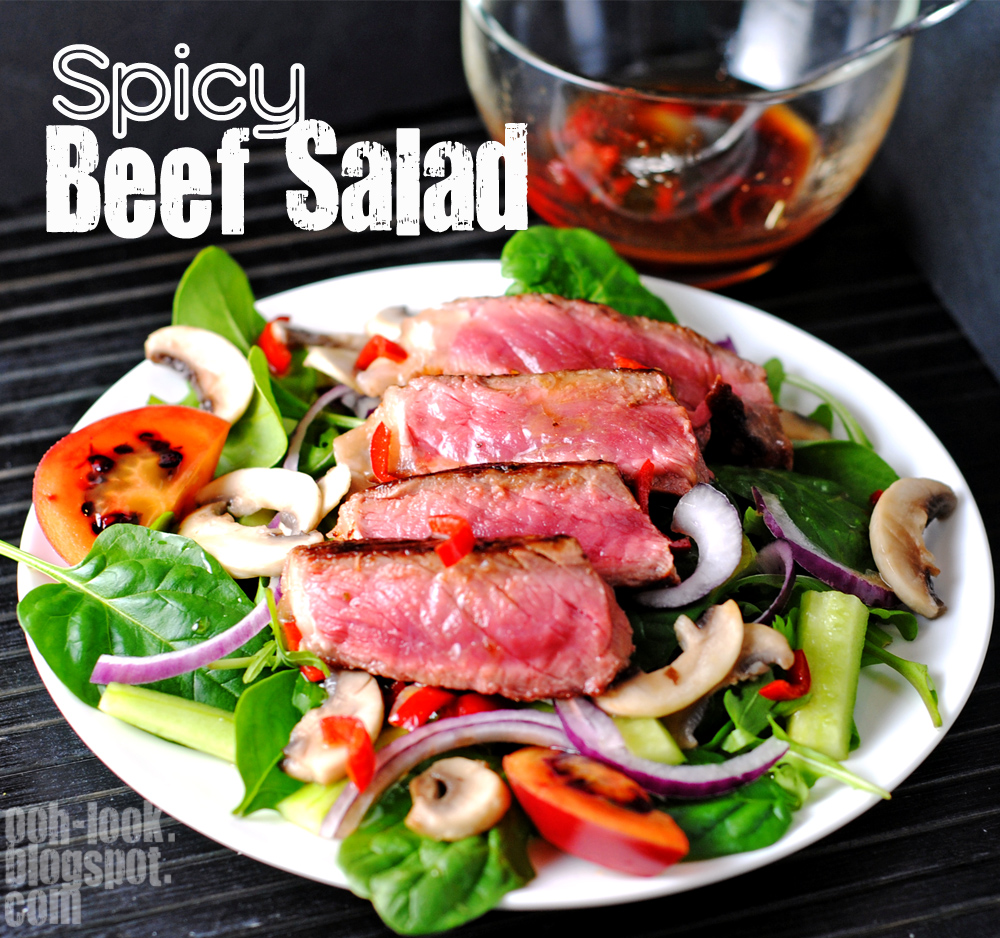
New Adventure: Spicy beef salad


The delivery of a new cookbook is a wonderful thing. There is the sense of anticipation after you order it and wait for it to turn up. The questioning of whether it will be as good as you hope. And what will the photographs be like?

Small Adventures in Cooking’ was a nice surprise when it arrived. It’s concise, informative, easy to read, and full of simple, eatable dishes. It’s written by James Ramsden, a young food writer who was named by The Times as ‘one of the 40 bloggers who really count’. In a change for me, it doesn’t have a picture of every recipe (I like to have a general idea of what I’ll be making) but the book makes up for it by being peppered with useful tips on ingredients and recipes, and interesting anecdotes of life in London. If I had a criticism, it’s only that the book doesn’t stay open and the spine is a bit stiff, but nothing that a can or two of diced tomatoes won’t solve.

Here’s the first recipe I made from the book. Very quick, appetising, and a repeated success.

Spicy beef salad
Serves 2

Ingredients
1-2 sirloin steaks (depending on size)
200g chestnut or button mushrooms, sliced
½ cucumber, cut into batons
½ red onion, finely sliced
2 cups salad leaves

Dressing
1 red chilli, deseeded, finely sliced
2 tblsp rice bran oil (or other neutral-tasting oil)
juice of ½ lime
½ tsp fish sauce
¼ tsp sesame oil
1 tsp soy sauce
pinch of sugar

Method
1. For the dressing: Mix the dressing ingredients in a bowl and set aside.

2. For the steak: Season the steak with salt and pepper and rub with olive oil. Heat a frypan to very hot and cook the steak for 2 minutes on each side. Remove to a plate to rest.

3. For the salad: Cook the mushrooms in the frypan with a splash of olive oil. Fry until softened, then remove from the heat. Put the mushrooms in a large bowl with the cucumber, onion and salad leaves. Add the dressing and toss together.

4. To serve, slice the steak, then arrange the dressed salad on a plate and lay the steak on top.

recipe adapted from Small Adventures in Cooking (James Ramsden)
Ingredients. I added a tamarillo because I'd bought one the day before.

And a beautiful piece of meat. This is a 'New York cut' steak.

Simply toss together with the dressing

Colourful, easy and delicious

Wednesday, June 22, 2011

Smoked Salmon Quinoa patties not suitable for cats

These are some delicious quinoa patties!

They are so easy to make, cook up a treat and taste amazing. What more could you ask for? Well, I could ask for a Tabitha cat that doesn't have such a sensitive nose that she can smell seafood (or any food) from a mile away. Never mind, I've got the making of these patties down to a fine art, so no sooner than I have the salmon out of the packet then it's in the bowl being shaped into patties. Nothing like a greedy, beady-eyed cat to make you work faster...

Speaking of smoked salmon, I use Tassal brand 'Smoked Salmon for Cooking', which I get from the supermarket. It's a lot more economical than normal smoked salmon because, although it does have some brown flesh (and the occasional bone), appearance doesn't matter so much when you are throwing the fish into a pasta or other cooked dish. You could also use leftover roast chicken in these patties, and you'll still get the goodness of the quinoa.  Win/win!

Quinoa and Smoked Salmon Patties
makes 8

Ingredients

1 1/2 cups water
3/4 cup quinoa
200g (1 cup) smoked salmon pieces or offcuts
1/3 cup dry bread crumbs
2 eggs, lightly beaten
1/2 red chilli, finely diced
pinch of dried chilli flakes (optional)
2 tblsp chives or spring onions, finely chopped
juice of 1/2 lemon or lime
salt and pepper

Method
1. For the quinoa: In a medium saucepan, bring the water to the boil and add the quinoa. Cover the pan and reduce heat to simmer, then cook for 10-15 minutes, until the water is absorbed. Remove from the heat and set aside until the quinoa cools slightly.
2. To make the patties: Mix all the remaining ingredients in a bowl with the quinoa. Take 3 tablespoons of the mixture and use your hands to form into a flat, burger-shaped patty, pressing together firmly. Place the patties on a plate and chill in the refrigerator for 30 minutes.
3. Heat 1/2 tablespoon of the olive oil in a large non-stick frypan over medium heat. Cook the patties for 4 minutes on each side, or until golden brown. Serve warm or cooled, with mayonnaise or a squeeze of lime.

Ingredients, including quinoa, breadcrumbs (I used coarse panko crumbs), eggs, salmon offcuts, chives, chilli and lime

After cooking the quinoa, mix with the other ingredients to form patties

A lovely golden crust forms on the patties, like rice cakes, but tastier.

I like to serve these quinoa patties with wasabi mayonnaise, but they're just as sublime with a squeeze of lime.

Tabitha cat was lurking in the shadows, attracted by the scent of juicy salmon (she didn't get any of these quinoa patties, though *evil cackle* haha!)

Friday, June 17, 2011

Fusion green tea panna cotta

After a successful recent foray into the world of panna cotta, I thought I'd try another version using Japanese green tea (matcha) powder. Now, matcha is made by grinding up green tea to a fine powder. It is used mainly in tea ceremonies, so given that I don't have any tea ceremonies planned in the foreseeable future, using it in this fusion green tea panna cotta is the next best thing.

Don't you love Asian desserts?  I adore the ones that have adapted the finer aspects of Western confections (ie. the whipped cream-laden parts) with traditional Japanese ingredients like adzuki (red beans) and matcha. I remember the first time I saw a green tea dessert - "Wow, look at the wasabi ice cream". Duh!

My copy of the yoshoku cookbook came in handy for this dessert, as it's full of contemporary Japan-inspired dishes. So another panna cotta success - we're on a roll and not ready to apply the brakes just yet!

Green tea Panna cotta
serves 6

Ingredients
1 1/2 tsp Japanese green tea powder
600ml (21 fl oz) cream
1/2 cup caster (superfine) sugar
3 tsp gelatine powder
1/2 cup milk
1/2 tsp vanilla extract

Method
1. Put the green tea powder in a saucepan with a little of the cream and mix to form a paste. Whisk in the remaining cream, ensuring there are no lumps. Add the sugar to the saucepan, stirring to dissolve the sugar, then slowly bring to the boil over medium heat. Remove from the heat.
2. Put the gelatine in a small bowl and whisk in 1/4 cup of the hot cream to form a smooth paste. Return the mixture to the saucepan, stirring until the gelatine has completely dissolved. Rest for 10 minutes to infuse.
3. Strain mixture into a large bowl and then pour in the milk and vanilla and stir to combine.
4. Pour into six 1/2 cup teacups or moulds and chill for at least 3 hours, or until set.

recipe adapted from yoshoku by Jane Lawson
Ingredients.
I used half full-fat cream and half 'lite' cream.

Mix the matcha powder with some cream to form a paste before whisking in the rest of the cream over heat.

You have to strain the gelatined mixture to get rid of undissolved bits before pouring into moulds (or teacups here)

Some grated white chocolate is sprinkled on top, or you could add stewed fruit

The intense green colour fades slightly as the panna cotta sets in the fridge.

The texture is smooth and creamy.
The panna cotta can also be unmoulded after dipping the cups in hot water for a few seconds.

Sunday, June 12, 2011

Kedgeree fit for a memsahib


Kedgeree
ked·ger·ee/ˈkejəˌrÄ“/Noun
1. An Indian dish consisting chiefly of rice, lentils, onions, and eggs.
2. A European dish consisting chiefly of fish, rice, and hard-boiled eggs
If this google definition is to be believed, this here is the European version of kedgeree.

You can just imagine the Colonial residents in the age of the Raj tucking into kedgeree for breakfast, their cook having modified the traditional recipe with the addition of fish and boiled eggs to suit their Western tastes. When the recipe was transported back to Victorian England, smoked haddock was added to give it a more distinctive flavour.

I often cook simple rice dishes - fried rice, chorizo rice ('paella'), kedgeree - as a quick dinner. They are fantastic because when you throw in leftover bits and pieces, the dish comes together very easily. This is a prime example.

Kedgeree
serves 2

Ingredients
2 eggs
25g butter
1 onion, finely chopped
1 cup long grain rice
1 red capsicum, deseeded, cut into 1cm pieces
1 tbs mild curry paste or curry powder
1/2 tsp ground turmeric
Salt and freshly ground pepper
500ml vegetable stock
100g smoked trout or smoked salmon, flaked into pieces

Method
1. Cook the eggs in a saucepan of boiling water for 5 minutes. Drain, cool slightly, then peel and quarter.
2. Melt the butter in a saucepan over a medium heat. Add the onion and cook, stirring, for 5 minutes or until soft. Stir in the rice, capsicum, curry powder or paste and turmeric. Pour in the stock and a pinch of salt. Bring to the boil, cover and cook over a low heat for 15 minutes.
3. Remove the fish skin and discard. Flake the fish and stir through the rice. Season with salt and pepper. Cover and set aside for a further 5 minutes. Serve with the eggs.

recipe adapted from taste.com.au

Ingredients. Fish is not shown, but for this, I used smoked salmon

Wonderfully colourful kedgeree, with quartered soft-boiled eggs.

Thursday, June 9, 2011

Spring pasta and a Rant

Follow my blog with Bloglovin

What is this 'Spring Pasta?', you ask. It's not Spring anywhere in the world at the moment.
Well, I'm just a bit backlogged with the blog, so this recipe's a bit belated.

Okay, enough with the alliteration. I found this simple dish at 101 cookbooks and adjusted it to match the availability of produce at my local supermarket, ie. I had to leave out a lot of ingredients.  Nonetheless, it turned out reasonably well. If I make this again, I would cool the pasta a little before adding the eggy sauce, as it cooked a bit when added to the warm pasta.

Oh, and for a bit of a rant about my local store, go to the end of this post.

Spring-ish Pasta
serves 2

Ingredients
8 ounces / 225 g cooked, long pasta (like spaghetti, fettucine)
2 eggs
fine grain sea salt
1 tablespoon olive oil
1 tablespoon unsalted butter
2 cups of sliced, blanched asparagus, and/or pea shoots, or sliced broccoli trees, or other shredded greens
1 avocado, chopped

Method
1. Separate the pasta, so it's not clumpy or stuck together. Set aside.
2. In a small bowl, crack the eggs and beat well with a pinch of salt and set aside.
3. In a big frypan or skillet, melt the oil and butter over medium high heat. Add any vegetables that take longer to cook (asparagus, broccoli) to the pan . Add a couple pinches of salt, stir, cover, and cook until the vegetables are bright, and just cooked.
4. Stir in anything that just needs just quick cooking (snow pea shoots and soft greens).  Stir, and cook just until tender - a minute or so. Pull about 1/3 of the vegetables out of the pan and set them aside.
4. Add the pasta to the pan and toss well. Once the pasta is hot, turn down the heat, wait a moment, then quickly stir in the eggs. Stir well, then cover the pan, remove from heat, and let sit for a minute. Uncover, give everything another toss, the egg should be cooked through. Taste, and adjust the seasoning before dividing between two plates. Top with the reserved vegetables, and some chopped avocado.

recipe adapted from 101cookbooks.com

Ingredients: angel hair pasta, asparagus, broccolini, avocado

Chopping the blanched asparagus; eggs with a dash of truffle salt; just before tossing it all together. I also added a couple of anchovy fillets after heating the oil.

Some avocado and lots of pepper top the tangle of pasta and veg.
This is a nice, light dish that can be made with any combination of greens you have available, subject to your crapppy local supermarket.

-----

--- A Rant ---

I did try and find some snow pea shoots as specified in the original recipe, but the supermarket did not have any. Nor did they have any red capsicum or loose mushrooms, either. In fact, they were mushroom-less and capsicum-less for about a week. No one knows why.

So I picked up a bunch of broccolini and some thin asparagus (and was grateful to get it!) to go with the pasta. Imagine my shock when removing the label on the asparagus to see that it was 'Product of Peru'. Peru! Now, no offence to our South American friends, I'm sure your asparagus is the pride of your nation, but does Woolworths really have to ship it half way around the world in order to sell it in Sydney? It wasn't that expensive (less cost than a bottle of milk), and it tasted like most asparagus, but I hate the idea of the unnecessary trip that it took. And how fresh it might be by the time it got here.
That is all. Thanks for bearing with me. Though after the e. coli outbreaks in Europe recently, it does show how easily germs and microbes might travel, even if they do it in the hold of a plane or ship. Moral of the story: Wash your veges.


Sunday, June 5, 2011

Ricotta pancakes to reduce paper footprint

hi, I'm Bel and I'm addicted to online shopping
hi, I'm Bel and I'm a magazine-aholic
hi, I'm Bel and I'm a cookbook addict
...
hi. I'm Bel. I'm a lost cause.

I read today that the average adult buys 28 kilograms (56 lb) of clothes per year, and probably throws out the same amount. Also today, I cleaned out my wardrobes and came up with 3 HUGE bags of clothes to be thrown out, gifted to relatives, and donated to St Vinnies. The reason for the cleanout was my recent spending on sites such as asos.com, topshop.com and modcloth.com, and no more wardrobe space. I blame the strong Aussie dollar that makes the clothes overseas soooo gorgeously tempting. It's not my fault, right?

No one seems to have done a survey on the number of magazines and cookbooks bought and recycled per annum, but if they did, I would be in the upper percentile of conspicuous consumers. I MUST somehow get an e-reader to reduce my paper footprint on the planet and reduce the fire risk at my place. I currently do not have an e-reader, so it's not my fault, right?

This recipe for breakfast ricotta pancakes is courtesy of the 'mini cookbook collection' issued by taste.com.au recently. From Gary Mehigan's Comfort Food, the cookbook measures 13cmx13cm, so it is indeed mini. If only other cookbook makers would follow suit, it would make my paper collection a lot smaller.

Ricotta Pancakes
serves 4

Ingredients
250g self-raising flour
pinch of table salt
50g caster sugar
1 egg
300 ml milk
25g unsalted butter
75g firm ricotta, drained and crumbled
vegetable oil or butter, for cooking

Method
1. Sift the flour and salt together, then add the sugar. In another bowl, whisk the egg and milk together, then add to the flour mixture. Beat well with a whisk to remove any lumps.
2. Melt the butter in a frypan over low heat until it bubbles and becomes nut-brown. Whisk the brown butter into the batter then stir in the ricotta; don't worry if there are a few lumps.
3. Heat a heavy-based non-stick frypan over medium heat with a drizzle of oil. Place a small ladleful of the batter into the hot pan and cook for 2-3 minutes. When bubbles appear on the surface, gently turn the pancake over and cook for another 2-3 minutes. Transfer pancake to a plate and repeat with remaining batter. This should make about 8 pancakes.
4. Serve the pancakes with butter and maple syrup or honey.

Ingredients, including flour, milk, egg and ricotta cheese

Lovely light and fluffy pancakes.
But it does take time to make 8 pancakes, so you need to keep the cooked ones warm while you stand over the stove and pour and check and flip and cook, and pour and check and flip...

Umm, yeah.
Things go better with Bacon.

Wednesday, June 1, 2011

Writer's block and caramel chicken


There's not much to this post, unfortunately, because I have a painful case of writer's block.
It's the weather, I think, that's got me a bit bleah, and it's affecting everything I do. For example, it's taking me ages in the morning to decide what to wear, and as a result, I'm always late for work (hmmm, this could, however, be due to my very extensive, online-bought clothing options - too much choice, too little time).
Never mind, sunny days will soon be here and bloggy things will hopefully be back to their bright and breezy self. There, I'm feeling better already! Hope you are, too...!

Caramel chicken
Serves 2

Ingredients
½ tblsp vegetable oil
½ tsp sesame oil
1 cloves garlic, finely sliced
1 small red chilli, seeded and finely sliced
2 large or 3 medium chicken thigh fillets, sliced, seasoned with salt and pepper
¼ cup Japanese rice wine vinegar
¼ cup mirin
1 ½ tblsp caster sugar
1/8 tsp dashi granules
1 tsp soy sauce

Method
1. Heat the vegetable and sesame oils in a large frying pan over low heat. Add the chicken pieces and cook for 5 minutes, then turn and cook for another 5 minutes on the other side, or until just cooked through. Remove from the pan and set aside.
2. Combine the vinegar, mirin, sugar, dashi and soy sauce with ¼ cup water and slowly add to the pan. Stir to dissolve the sugar, then scrape up any cooked bits on the bottom of the pan. Bring to the boil and cook for 3-5 minutes or until slightly glazey.
3. Return chicken to the pan and turn the chicken to coat in the sauce. Remove from the heat.
4. Serve with rice or noodles and steamed vegetables.

Recipe adapted from yoshoku by Jane Lawson

Do you know this cool way of deseeding a capsicum?
1. Push in the stem  2. Pull out the stem  3.  Seeds are removed!

This caramel chicken was served with the cleverly deseeded capsicum, some snow pea shoots and vermicelli

The dish has a caramelly, sour and hot taste that is brilliant with the chicken

Phew! I'm exhausted. Hope writer's block is curable...

Wednesday, May 25, 2011

Honey vanilla panna cotta - ASAP!


I was shocked to notice that the last time I made panna cotta was over a year ago (in this lovely lychee-flavoured one, here). So, for someone who always orders panna cotta when it's on a menu, this situation had to be rectified asap. By the way, does any one actually say 'ay-sap'? Or do you spell out each letter, 'A-S-A-P'? Or take your time to say, 'as soon as possible'? OMG! WTF! LOL!

A quick interweb search unearthed this gem from New Zealand celebrity cook, Annabel Langbein. I think I remember seeing her make this honey and vanilla panna cotta on her 'Free Range Cook' TV show last year. I actually find her a bit irritating to watch - she was always driving a massive four-wheel-drive around the countryside to produce markets, or picking asparagus and plums from her orchard. Then all these people (invited guests, presumably) would descend on her farmhouse and eat the food. I think I'm just jealous because I wasn't there.

The recipes, though, are awesome - simple to make, from everyday ingredients - and they look like they taste wonderful. This panna cotta was certainly easy to make, with a hint of sourness from the buttermilk and the rich flavour of the honey and vanilla really shines through.

 
Honey and Vanilla Panna cotta
serves 8

Ingredients
2 cups cream, divided in half
1 vanilla pod, split lengthwise, or 2 tsp vanilla extract
½ cup honey
½ cup sugar
4 tblsp cold water
4 tsp unflavoured gelatine
2 cups buttermilk

Method
1. Place 1 cup of the cream in a saucepan with the vanilla pod, honey and sugar and heat, stirring, until the sugar has fully dissolved. Simmer for 1 minute.
2. Remove the pot from the heat and lift out the vanilla pod. Split the vanilla pod open and scrape out the seeds. Add the seeds back into the cream mixture and whisk to combine. The leftover pod can be rinsed and dried and stored in a container of sugar to add vanilla flavour to it).
3. Place the cold water in a small bowl and sprinkle the gelatine over the top, stirring until it is fully absorbed. Add the soaked gelatine to the hot cream, stirring until it is fully dissolved and there are no lumps.
4. Cool the mixture for 15-20 minutes, stirring often (it needs to be cool before the buttermilk is added or it will split). Lightly whip the remaining cup of cream and stir it into the cooled mixture, then whisk in the buttermilk until the mixture is smooth.
5. Divide the mixture between 6-8 serving glasses. Cover and refrigerate until set. This should take about 3-4 hours or up to 24 hours. Serve chilled.

recipe from lifestylefood.com.au
Simple ingredients.
By the way, if you're worried about the taste of powdered gelatine in this recipe, don't be; the vanilla and honey effectively mask it.
To test the wobble factor of this panna cotta, I put some of them into teacups and then unmoulded them.
They had a nice wobbliness and were relatively easy to remove from the moulds.
 
I picked up these pretty serving glasses from the local flea market at 50 cents each - bargain!
They perfectly show off the creaminess of the panna cotta.
 
These were served with cubes of pear, blueberries and passionfruit.
And some crisp chocolate 'cigars'.
Five stars for this dessert - I still can't get over how beautifully they turned out.

Sunday, May 22, 2011

Déjà vu mushroom risotto

Do you ever get that feeling of je ne sais quoi, where you start humming a long-lost song in your head and it comes on the radio? Or when you are doing something and get the feeling that it’s happened before (that’s déjà vu, isn’t it?).

Well, I had decided to make a porcini mushroom risotto for dinner the other day, and half an hour before I started it, I was watching Jamie Oliver on television, and he was showing how to make mushroom risotto! Spooky.

What was particularly interesting was the ‘real Italian’ method he used to cook the risotto, including putting the lid on the pan after cooking, to let the rice ‘rest’. As it turned out, the recipe I used (by Tobie Puttock), also recommends resting the rice in the same manner. Perhaps it’s a common method, but it was new to me, and therefore a bit uncanny. And maybe the lashings of butter and parmesan cheese is also traditional – I certainly hope so, because it was delicious.

By the way, I didn’t mean to post another mushroom risotto recipe so soon after the last one, but it’s just what we had for dinner recently (that was worth posting about!).

Risotto ai porcini, salvia e pancetta
Risotto of porcini mushrooms, sage and bacon

Ingredients
1 litre hot chicken or vegetable stock
30g dried porcini mushrooms
50g butter
1 tblsp extra virgin olive oil
1 small onion, finely diced
1 celery stick, finely sliced
8 slices flat pancetta or bacon, finely sliced
250g risotto rice
100ml dry white wine
50g grate parmesan cheese
Salt and pepper

Method
1. Pour the stock into a saucepan and add the porcini. Bring to the boil, then reduce to a simmer. After 5 minutes, remove the porcini and coarsely chop and set aside. Leave the stock on low heat.
2. In a heavy-based pan, melt 20g butter and all the olive oil over low-medium heat. Add the onion, celery, pancetta and sage, and sweat for 5-10 minutes, stirring, until the vegetables are soft. Add the rice and cook over a low heat until it becomes translucent.
3. Add the wine to the rice mixture and stir. When the rice has almost completely evaporated, add a ladle of hot stock and stir until almost absorbed. Add the porcini mushrooms. Continue to add the stock a ladle at a time until the rice is al dente (20-25 minutes).
4. Remove the pan from the heat and add the parmesan and remaining butter. Stir well, then cover the pan and allow to rest for a minute or two. Season with salt and pepper, if needed.
5. Serve immediately with more parmesan.

Recipe adapted from Cook like an Italian by Tobie Puttock

Ingredients, including bacon/pancetta, celery, onion, stock, dried porcini mushrooms and carnaroli rice.
Forgot to show the sage.

The usual way of making risotto: Stir in the white wine until the rice becomes translucent, then add the hot stock, a ladle at a time

The sage adds a lovely flavour to the risotto. The dried porcini, sage and bacon also contribute.

This risotto turned out bellissimo!

Saturday, May 14, 2011

Bite this: Chocolate Caramel Bites

I was quite interested to see another use for ANZAC biscuits in the newspaper a couple of weeks ago, and even more interested to see it being attributed to Masterchef Australia judge Matt Preston. Cravat Matt writes for several food mags and has even been featured in 'what I cook at home'-type stories (he happily barbeques slabs of meat by the looks of it). I've never cooked from anything of his, so I thought I'd give these Chocolate Caramel Bites a try.

Note: Choc Caramel Bites are my name for these. The original recipe calls them 'ANZAC cups with caramel' which I thought was a misnomer. Why? Because you're supposed to use ANZAC biscuits to produce something like this:
The thing is, the recipe just says to use a 'muffin tray' to make the cups, but doesn't specify what size tray to use. AND you'll notice in the newspaper clipping that there is only one cup pictured. It's always suspicious when you see just one or two things because it makes you/me think that these are the only ones that worked, and in the background is a sobbing chef surrounded by broken biscuits and over-wrought minions. And a food stylist trying to wrangle a photograph with a single ANZAC cup and some slices of mango.

Onto the recipe -- I ended up using a mini muffin pan (12 cups per tray) because my ANZAC biscuits were smallish. You have to squeeze the warm ANZAC biscuits into each muffin hole. They will break. You have to squash them together until they fuse up and reform. You may eat the many leftover crumbs and failures.

So these are 'bites' rather than 'cups'. They turned out surprisingly well, moreish little bits of almost-burnt caramel that was offset by the sweet chocolate and yummy ANZAC base. Maybe the Cravat can be trusted after all.

Chocolate Caramel Bites
makes 24

Ingredients
24 ANZAC biscuits, just baked (previous ANZAC biscuit recipe is here)

Caramel filling:
1 cup sugar
50g butter
1/4 cup cream
Ganache:
1/2 cup cream
150g dark or milk chocolate, chopped
40g butter, chopped

Method
1. For the base: Bake your ANZAC biscuits, but do not let them cool completely. While the biscuits are still warm, push each biscuit into the holes of a mini muffin tin and shape it around the hole to get a cup shape. If they break, just push them back together. Do this with 24 ANZAC biscuits.  When cooled, gently tip the formed biscuits out of the muffin tin and set aside.
2. For the caramel filling: In a heavy-based large saucepan, heat the sugar until the sugar crystals dissolve, the mixture boils and starts to become a golden colour. Do not stir once the sugar has started to boil. When this stage has been reached, whisk in the butter with the pan on the heat - be careful, as it may bubble over. When the butter has melted, remove from the heat and pour in the cream. Again, it may froth.Gently stir with a metal whisk to combine. Let the caramel cool slightly, and while it is still quite liquid, pour into each of the biscuit cases almost to the top. Place in the fridge to set.
3. For the ganache:  Melt the chocolate in the microwave (Low setting, in 30 second bursts, until almost fully melted). Warm the cream in a saucepan but do not boil.  Add the melted chocolate to the cream and stir to combine.  Mix in the butter bit by bit until it's all incorporated and the ganache is sleek and glossy.  Let the mixture cool for 10 minutes, then spoon the ganache on top of the caramel cases. Leave to set before serving.

Store the caramel cups in an airtight container in the refrigerator for up to 3 days.

- If you have any leftover ganache, then it can be stored in the fridge for up to a week. Melt it in the microwave or on the stove and pour over ice cream. Yum.
- You could also make these bites with other chewy, homemade biscuits, such as gingernuts or brandy snaps.

recipe adapted from Taste in the Daily Telegraph


So the warm, just-baked ANZAC biscuits are forced into the the muffin tin. See the mess? I made that! I used a wodge of paper towel to protect my finger from the heat of the biscuits when I pressed them into the tin.
When cool, remove the cases from the tin. If you try this recipe, you may want to ensure that the sides are a bit more level than mine.

Making the caramel: I was a bit slow in noticing that the caramel had turned and it was just on the point of being burnt when I removed it from the heat. That's why it's such a dark brown colour.
Fill the cases with the cooled caramel. Again, if the sides were level, then it wouldn't have leaked so much.

Top the caramel with chocolate ganache, then refrigerate to set.


These bites were a success. How can you tell? Well, try and stop at just one...
PS: A sprinking of salt flakes on top increases the enjoyment.
LinkWithin