Pages

Friday, February 25, 2011

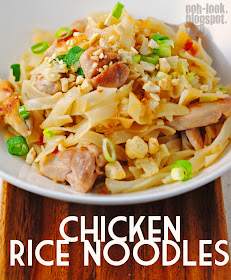
Chicken rice noodles from Asian-inspired surrounds


While traipsing around my neighbourhood (the suburb of Balmain in Sydney, to be precise), I noticed yet again the number of Asian restaurants along the main street.  Thai, Vietnamese, Chinese, Japanese, Indian, mix of other south-east Asian - they are all well represented, along with a pub on every corner. I'd say that Balmain's heyday (trendiness-wise) was more than 10 years ago, and the suburb is waiting for a gourmet revival, like Surry Hills or Neutral Bay, so we are yet to encounter trendoid tapas, churrasco, whole lamb on a spit, and the like.

Then I got to thinking: what cuisines are popular in other countries, and does a country's proximity to a particular area (like south-east Asia) have a bearing on the restaurants that do well? Of course, serving good food is also a pre-requisite to doing well, something that our local restaurants have not heeded... If you live in the UK, or USA, or Germany, or Brazil or anywhere else, what food is most popular for takeaway/takeout? Please don't say fast food!

Which brings me to tonight's dinner - it's another Asian-inspired dish, sort of like pad thai. It's just something thrown together with random ingredients and a semblance of a recipe. Actually, there is no recipe as such, but I've written one out anyway.

Chicken with Rice Noodles
serves 2

Ingredients
120g dried flat rice noodles
3 chicken thigh fillets
2 tblsp sweet chilli sauce
1 tblsp lemon juice
1 clove garlic, crushed
1 tsp vegetable oil
1 tsp soy sauce
50g cashews or peanuts, lightly crushed
2 spring onions, chopped

Method
1. Marinate the chicken: Mix together the sweet chilli sauce, lemon juice and garlic, then place the chicken into the marinade and leave for 15 minutes.
2.  Place the rice noodles in a large bowl and cover with boiling water. Leave for 5 minutes, or until the noodles have softened.  Rinse with cold water, then drain well.
3.  Heat the vegetable oil in a frypan over high heat and cook the chicken for about 5 minutes, until cooked through. Remove the chicken from the pan and slice into strips.
4.  Reduce the heat and place the noodles in the frypan, mix in the soy sauce and quickly stirfry for 30 seconds.
5.  To serve, place the rice noodles in a bowl, mix through the spring onions, top with the chicken and cashews. 


Ingredients, including sweet chilli sauce, cashews, rice noodles and spring onions


There's a little bit of heat in the chicken from the sweet chilli sauce, but feel free to add more sauce before serving


The cashews add a crunchy finishing touch to this tasty dish.

Tuesday, February 22, 2011

Pineapple duck to the MAX!

I must admit, I get quite flustered when I'm cooking, especially when trying out a recipe for the first time. 
I spend an inordinate amount of time staring at the instructions (and there must be written instructions) while preparing a shopping list for ingredients.  When I'm ready to actually start cooking, I stare at the cookbook/sheet of paper/page from a magazine and ponder which bit of the preparation needs to be done first - chopping, mixing, defrosting, preheating.

Then, chewing my bottom lip in consternation, I make a tentative move to get all the ingredients ready.  Of course, I have to photograph each step, and this is a real benefit because it means that all the ingredients get measured out before they are used, and this really saves time and prevents mistakes later on.
When the cooking process starts, I'm constantly referring back to the recipe, to make sure that everything is done to the letter. Although, now that I've been cooking blogging for a while, I let instinct (and my taste buds) take over occasionally, and I lash out by adding a bit more seasoning or whatever, just to show that I'm not a complete goody two shoes in the kitchen.

This recipe is not from a cookbook/sheet of paper/page from a magazine.  It's from the ever-entertaining Recipe Rifle (though it's originally from the River Cottage cookbook).  I was going to serve it in the style of an Asian curry, all together in a bowl, but it ended up on a plate, in the style of a half-fancy European dish.  Gosh, I'm such a radical!

Duck with pineapple
serves 2

Ingredients
2 duck breasts
70g pineapple pieces (if using canned, reserve the juice)
3 tblsp soy sauce
1 tsp soft brown sugar or honey
3 garlic cloves, chopped
1 tsp minced ginger
1 fresh red chilli, chopped
2 spring onions, chopped
black pepper

Method
1.  For the marinade: Combine 4 tablespoons of pineapple juice, half the pineapple pieces, soy sauce, sugar/honey, garlic, ginger, chilli and black pepper. Slash the skin of the duck breast and put the duck into the marinade for at least 30 minutes (or longer).
2. Preheat oven to 200C.  Wipe the marinade off the breasts and sear them quickly in a hot pan in some vegetable or rice bran oil, for about 2-3 mins each side.  The meat should be lightly browned and the skin crisp.
3. In a small roasting tin that's just big enough to fit the duck breasts, lay the breasts on top of the spring onions, then pour over the marinade. The duck needs to poach in the marinade, so don't use a tin that's too large.
4.  Roast in the oven for 10 minutes then remove the duck and allow to rest.  Reserve the marinade.
5.  Heat a teaspoon of vegetable oil in a small pan and ligthly fry the remaining pineapple pieces, until they get some colour. Sieve the marinate into the pan (you can add the marinated pineapple pieces from before) and reduce to a syrupy sauce.
6. Slice the duck and arrange on a plate in a half-fancy European manner.  Spoon over the sauce and pineapple pieces.  Serve with jasmine rice. 

Ingredients, including duck breast, pineapple (canned), soy sauce, brown sugar, garlic, ginger, chilli and spring onions.  Mix the marinade in a roasting pan then add the duck.

Serve the duck on with the reduced sauce and pineapple and some rice.

You can serve this in a bowl, or, if you want to be maxtreme, on a plate.

Friday, February 18, 2011

Oh, Figs! Or... Honey I'm Blue (cheese) without you

This is more of an 'idea' than a recipe, so I feel a bit of a slacker in posting this. Please forgive me!
But the fresh fiigs were so lovely (and cheap!) and it was the work of an instant to throw them in my trolley at the grocer's and start thinking about what to do with them.

I think it's a bit of a waste not to eat fruit raw when it's at its prime - the summer nectarines, peaches and plums are brilliant at the moment, and there's nothing like biting into a lightly chilled piece of fruit that is heavy with juice.  And so it is with these figs - I was thinking of baking them with some prosciutto, but laziness, a lack of prosciutto and steamy, humid weather (no baking, thanks!) won out.  Also, I was so languid that making a balsamic sauce was too much effort; luckily, some fragrant floral honey is perfect when drizzled on the blue cheese, which in turn complements the soft, sweet figs flawlessly. 

Figs with blue cheese and honey
serves 2

Ingredients
2-3 ripe figs
70g soft blue cheese
30ml runny honey

Method
1.  Cut the stem from the figs, then cut a deep cross in the top of the fig and spread out slightly
2.  Crumble the blue cheese over the figs, then drizzle the honey on top. Serve.

A soft, ripe fig is blissful on its own...
...but add blue cheese and honey, and it's ambrosial.
By the way, have you tried blue cheese with just honey - the combination of salty/sharp and sweet is surprising but addictive.  It would make a fantastic dessert.

Tuesday, February 15, 2011

Fried rice - at least it's not boiled rice

Has anyone ever researched 'rice dishes of the world'? After all, rice is the staple food of most of the world's population.  I must admit that I have an ambivalence towards plain white rice - growing up, we had boiled rice with most meals and its sticky white boringness really bored me to tears.  Even now, I rarely have plain rice except when it's needed to mop up the sauce from a tastier main dish. 

Reaching into some long-lost Asian roots, fried rice is something that I prepare when I don't have much time to make dinner - or when I haven't thought about what to make.  I like how you can throw in pretty much anything, and I love how the addition of several tasty sauces can transform that white boringness into yummy brown deliciousness.


Fried Rice with fried egg
Serves 2
Ingredients
8 green (uncooked) prawns, peeled, deveined and quartered
2 tblsp  plus 1 teaspoon vegetable oil
2 tsp minced garlic
2 tsp minced ginger
50 g shoulder ham or Chinese sausage or BBQ pork, chopped
4 shiitake mushrooms, soaked in hot water for 20 mins, finely chopped
2 cups cooked rice (admission: I use packaged, pre-cooked jasmine rice)
2 tbsp light soy sauce
1 tsp white sugar
2 tsp oyster sauce
1 tsp sesame oil
2 eggs
spring onions, finely sliced

Method
1. Heat a tablespoon of vegetable oil in a wok over med-high heat, until very hot. Add the prawns and stir until just cooked. Remove from the wok and set aside.
2. Reheat the wok and add heat a tablespoon of vegetable oil until very hot. Add the garlic and ginger and stirfry for 30 seconds.
3. Add the meat and mushrooms and cook for 1 minute. Then add the rice and prawns to the wok.
4. Mix the soy sauce, sugar, oyster sauce and sesame oil together in a cup, then add to the wok. Stir until rice is coated with the sauce.  Pour the rice into a bowl and wipe out the wok with paper towel.
5. Heat 1 teaspoon of oil in the wok until hot, then break an egg into the wok and cook until the white is set.  Repeat with the other egg.
6. To serve, divide the rice between two bowls and top with a fried egg and some spring onions.

Ingredients, including ham, shiitake mushrooms, prawns and egg.
.  Here, popping a fried egg on the rice makes it like Indonesian nasi goreng (another popular rice dish!).

Sunday, February 13, 2011

Valentine's Day love from Tabitha

Hope you have a lovely and loved day on February 14th.

And yes, I normally post pictures of cakes or macarons or macarons for Valentine's Day, but this year, my regular source (Adriano Zumbo Patissier) has been so packed out with like-minded cake lovers that I haven't been able to get in the door. 

So another type of sweetie - Tabitha cat - is the face (or should that be 'bottom') of Valentine's on Ooh, Look... xoxo

Wednesday, February 9, 2011

Spotted cow baked vanilla cheesecake


My Wishlist
I need several new whitegoods and appliances:
1. A new washer/dryer because the dryer part of the combo no longer works (though I don't mind drying clothes outside on the line, in summer, at least).
2. A stand mixer because I have puny arms and holding a handheld (plastic) mixer for even a small length of time is exhausting.
3. A 28cm non-stick frypan (Jamie Oliver Professional Series, please) because my current frypan's non-stick coating has rubbed off and it's no longer non-stick (and I've probably ingested several grams of non-stick coating in the process)
4. A new oven because the current oven has hotspots that flare unexpectedly, resulting in unattractive lesions on my baked goods...

Case in point - this is my all-time favourite cheesecake recipe, and it's been disfigured by my temperamental oven.  I really should have let it preheat for a bit longer before putting the cheesecake in, but I just didn't realise it would flare up and burn the top of the cheesecake.  Now my cheesecake looks like a weird piebald cow or something.  And not even some perfect strawberries could cover up the damage.  Just as well it did not affect the taste!

Regardless, you must give this cheesecake a try - it really is the best and so easy and classic to boot.  But make sure to get on your oven's good side beforehand.

Footnote: I've written about this lovely cheesecake before, here, although the pictures this time around are hopefully better.

Vintage Vanilla Cheesecake
Serves 6-8

Ingredients

The base:
1 cup Arnotts Scotch Finger or Nice biscuit crumbs (about 9 Nice biscuits, crushed in food processor)
6 tablespoons melted butter

The filling:
375g cream cheese (light cream cheese is fine), softened
2 eggs
½ cup sugar
2 tsp vanilla essence
1 cup light sour cream

Method
1.  To make the base:  Line a 20cm springform cake tin with aluminium foil, leaving an overhang to lift out the cheesecake. Combine all the biscuit crumbs with the melted butter and and press firmly into the cake tin.  Place in the refrigerator while you make the filling.
2.  To make the filling:  Beat the cream cheese a little until light and fluffy. Add the eggs, sugar and vanilla and beat until smooth. Stir in sour cream and mix well. Spoon into the base and bake in the centre of a pre-heated 120 deg C oven for 35 minutes or until the filling is set.
3. Remove from the oven and cool in the tin on a cake rack. Refrigerate if not serving straight away.
4. Serve at room temperature.
recipe adapted from Vogue Entertaining (Oct/Nov 1989).

Ingredients, including light cream cheese, Nice biscuits, melted butter, eggs, sugar, vanilla, sour cream, a reliable oven
These strawberries were utterly perfect (in taste and appearance), though the same could not be said for the spotted cheesecake
Never mind, it still tastes wonderful, and so creamy and smooth.


I was so disappointed with the blasted oven that I made another cheesecake the following week.  This time, I kept an eagle eye on the baking, and made sure the oven temperature was stable before putting the cheesecake in.  Ah, that's better...


Monday, February 7, 2011

Soba noodles with aubergine and ... fruit


Here in Sydney, a week of temperatures above 30 degrees C has meant salads for dinner every evening, followed by a Frosty Fruit ice block for dessert, followed by a night of sweat-drenched, disrupted sleep (and not in a good way).  That's how the past 7 days has panned out.  And didn't we all draw a deep breath of relief when the cool change swept into town... phew, I'll never complain about cool weather ever again!

Given the predilection for salads, non-creamy desserts and the unprecedented loss of bodily fluids, I'm actually surprised that I haven't lost any weight.  This may have something to do with the fact that I haven't been exercising either, just draped on the sofa each night, moaning about how hot it is and why the heck doesn't this house have air-conditioning??? That's just an aside...

One of the salads we ate was this fantastic combination from Ottolenghi's Plenty cookbook.  It takes soba noodles (which are brilliant when served cold) and lightly pan-fried eggplant and mixes them with mango. Well, I would have used mango if the ruddy supermarket had any - there was a dearth of mangoes even before the recent cyclone Yasi, so I had to substitute nectarines instead. Any type of mellow yet firm fruit will do, though I'd hesitate to recommend something like pineapple or orange. Best stick with the known and trusted.

Soba noodles with aubergine and nectarines
serves 2-3

Ingredients
60ml rice vinegar
20g caster sugar
1/4 tsp salt
1 garlic clove, crushed
1 tsp sesame oil
grated zest and juice of 1 lime
100ml sunflower oil
1 aubergine, cut into 2 cm dice
150g soba noodles
1 mango or 2 nectarines, flesh cut into 1cm dice
70g marinated firm tofu, cut into 1 cm dice (optional)
20g basil leaves
1/2 red onion, thinly sliced

Method
1.  For the dressing: In a small saucepan, gently warm the vinegar, sugar and salt, just until the sugar dissolves.  Remove from the heat and add the garlic and sesame oil.  Alllow to cool, then add the lime zest and juice.
2.  For the aubergine: Heat the sunflower oil in a large pan and shallow-fry the aubergine in batches.  When golden brown, remove to a colander, sprinkle with salt and allow to drain.
3.  Cook the noodles in boiling water for about 6-8 minutes, until tender but still with some 'bite'.  Drain and rinse well under running water.  Leave the noodles to dry in a clean tea towel.
4.  In a mixing bowl, toss the noodles with the dressing, nectarines, aubergine, onion, basil and tofu, if using.  Mix well, then serve.

recipe adapted from Plenty by Yotam Ottolenghi

Ingredients, including nectarines (in the absence of mango), aubergine (aka eggplant), soba noodles, lime and garlic. The original recipe also calls for coriander, but you know what I think of that particular herb... hint: it's not angelic
  
Once the aubergine has been shallow-fried and drained, everything is tossed together. 
It forms a substantial and interesting salad. 
The good thing is, you can add whatever ingredients you have on hand - like the cubes of marinated tofu here.

Friday, February 4, 2011

Where's my buns - Chefs Gallery, Sydney

Ever since it opened, Chefs Gallery has had one big thing going for it - Piggy Buns! I ate at Chefs Gallery last week, so how were the buns? Read on to find out...

Chefs Gallery is located in a large modern space on the side of the Regent Place development (cnr George and Bathurst Streets, Sydney).  On a bright, sunny and very warm day, the blinds at the front are already drawn against the glaring sun. We arrived fairly early for lunch, just after 12pm, and the place was already quite full (it opens at 11am).  The decor is 'contemporary Chinese', with lots of dark wood and padded surfaces.
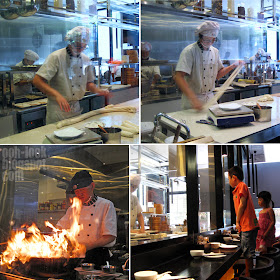
When asked if we wanted to sit at a table or the counter, I excitedly shouted, 'Counter!', because the counter fronts onto part of the kitchen, and the entertaining noodlemaker...

It's fun to watch the noodles being rolled and stretched. Lots of other cooking action as well, including Flames.

Onto the food.
The menu at Chefs Gallery isn't extensive when compared to those Chinese restaurants that have dozens (or hunderds) of dishes.  Here, there are some hot and cold appetisers, their famous handmade noodles, a couple of fried rices, dumplings, steamed buns, and of course, dessert, featuring the piggy buns.

Things didn't get off to a promising start because some of the dishes we wanted had a little 'N/A' (not available) sticker on them.  We worked around this and ordered alternatives, together with some 'freshly squeezed watermelon juice' because it was so hot.  Wouldn't you know it, there's no watermelon juice (nor the advertised pear juice, either).  We settled for cans of Coke.
Cold pork belly rolls ($8.90)
'Chao shou' prawn and pork wontons in spicy Shanghainese sauce ($8.90)
The pork rolls were pieces of blanched pork belly rolled around carrot and cucumber, refreshing on this hot day, though they could have done with a bit more sauce to liven up the taste. The dumplings were great, nice and soft, with most of the heat coming from the chilli sauce.
'Shou zhua bing' Chinese roti with pork floss($6.90)
'Guo tie' pan-fried pork and prawn dumplings ($8.90)
Fried rice with 3 types of egg ($13.90)
I'd never had Chinese roti before, and it's like a very thin shallot pancake with bits of spring onion scattered throughout the thin, flakey dough - I really liked this dish.  The pan-fired dumplings were only average, with the wrapper a bit tough.  The fried rice was amazingly good, filled with pieces of chopped egg (chicken, salted duck and century eggs).  Not too oily, either.

Feeling quite good at this stage, I had been saving some space for a piggy bun, but it wasn't to be - they were sold out! That's another way of saying 'N/A'. You'd think they'd prepare a surplus of these since they're so popular, but apparently not.

So we settled for a serving of the less-cute but hopefully still adorable 'pumpkin pastry dumplings'. We ordered, then waited. And waited.

After waiting for 30 minutes, we asked a waitress if they were coming any time soon. It was amusing to watch (from our vantage point on the other side of the glass window) as she marched into the kitchen and confronted the hapless kitchen cook who was responsible for the buns. Maybe not a good day for him, as he looked a bit flustered, probably because the piggy buns had run out.

Anyway, now that we had a target, we observed him for another 15 minutes or so while he bludged around having a drink and looking clueless.  Just as we were about to cut our losses and leave, the pumpkin buns arrived.
Pumpkin pastry dumplings ($5.90)
So, the pumpkin dumplings were ordered at 1:18pm, and they arrived just after this photo was taken, at 1:59pm.  They were okay, quite small (and therefore cute), with a gluey rice flour coating around a sweet lotus seed paste filling.  They were gone (into my tummy) in about 30 seconds flat.

Overall, it was a mixed experience at Chefs Gallery.  The dishes that we had were reasonably tasty, with the fried rice a standout.  The unavailability of some dishes was disappointing, as was the wait for the little pumpkin buns.  Also, I got a raging MSG-like headache/thirst/lethargy a couple of hours later, though I don't know if MSG was added to the food.  I may have to risk another visit to find out.

Chefs Gallery
12/501 George Street, Sydney, NSW
Ph: (02) 9267 8877


Chefs Gallery on Urbanspoon

Thursday, February 3, 2011

It's Chinese new year!


Wishing you a prosperous Chinese new year on February 3!

For details on the lucky card above, click here.


And how about some Chinese Almond Cookies to celebrate the occasion?

Tuesday, February 1, 2011

Freeze me now - Berry yoghurt ice cream

Hot -  humid -  sucks-the-life-out-of-you weather means:
...a craving for air conditioning 24x7
...sneaking a Frosty Fruit in the middle of the night
...hating it when the cat lies on top of you to sleep (normally a 'love')
...ICE CREAM!!

Ice cream is always a must-have in my house, so much so that there are several tubs of almost-finished ice cream taking up valuable freezer space. So many flavours, so little time!

I got the idea for this quick and easy treat while watching Jamie Oliver's 30 Minute Meals on television the other week. Have you seen the series yet? Jamie runs around the kitchen with several saucepans, frypans, food processors and kettles on the boil/whizzing away and prepares a 3-course meal in 30 minutes.  I think you'd have to be pretty incredible (or Jamie Oliver) to actually accomplish this, but it makes for good television.

Jamie whipped up an ice cream by mixing a couple of ingredients together, then plonking it in the freezer for 30 minutes while he made the rest of the meal.  I found that my ice cream didn't freeze completely in one hour, let alone 30 mins, though maybe my freezer isn't cold enough.  Just give it a little more time and you'll also be enjoying a scoop or two of this healthy and delicious dessert.

Berry Yoghurt Ice Cream
serves 2-3

Ingredients
1 1/2 cups natural or Greek yoghurt (no-fat or low-fat is okay)
1 cup frozen mixed berries or other fruit (mango would be lovely)
2 tblsp honey, to taste

Method
1. Put the yoghurt, frozen berries and honey into a food processor and mix until combined.  Don't mix for too long or the berries will melt - you want the berries to still be frozen.  Taste and add more honey if you want a sweeter ice cream.
2.  Scrape the mixture into a shallow metal container and place into the freezer for an hour or until almost completely frozen.
3.  To serve, scoop the ice cream into bowls and garnish with fresh fruit, if desired.  The ice cream melts quite quickly, so dig in as soon as possible.

Very simple - just frozen berries, no-fat yoghurt and honey. Mix. Freeze.
My ice cream had some ice crystals and would have benefited from a bit longer in the freezer.  It tasted wonderful...
Great idea, Jamie!